
I would like to share what was learned from this process. This upgrade is the first time we took advantage of a number of things: from the Fluid Portal Registry to Branding and I would like to go into detail about each. It is important to note, PeopleSoft Interaction hub is on the same Operating System as other PeopleSoft Environments: a lot of functionality discussed here can be used with any Tools 8.55 system.
PeopleSoft Interaction Hub 8.55 Discussion Sections:
- Setup and Integration Broker
- Tiles and HomePages
- Branding and Migration
- 8.55 Security
- Recommendations and Backwards Compatibility
- Comprehensive Testing
- Other Resources
Section One - Setup and Integration Broker
Properly configuring integration broker is one of the most challenging aspects of deploying PeopleSoft Interaction Hub. I will you refer you to my how-to article here to get the basics of this setup with stock functionality and troubleshooting tips. This article goes on to configure unified navigation, and will show how combined homepages and tabs work. If you are following along ~ it would be a good place to start with a working sandbox system.Section Two - Tiles and HomePages
With Tools 8.55 you are given a new canvas to design from. It is relatively easy to see how these are setup using the PeopleSoft Image 2 PUM demo data.
The two directories in the portal registry: (Nav Bar > Navigator > PeopleTools > Portal > Structure and Content) that you will need to pay the most attention to lie in the Fluid Structure And Content directory:
 |
| The two directories you will be mostly working in during an 8.55 implementation for Interaction Hub |
Fluid Homepages Directory
Corresponds to the Homepages a user has access to when they login. If you setup Integration Broker correctly, you will notice that all Homepages in each PeopleSoft Environment will merge together: for example, the Manager Self Service Homepage doesn't exist on Interaction Hub, but rather Human Resources, yet it will be accessible as a Homepage in IH.

If you are familiar with PeopleSoft Classic technology, Homepages most closely resemble Homepage Tabs ~ although they are not 100% the same. See the chart below explaining the differences:
| Fluid Homepages | Homepage Tabs | |
| Contain Fluid Tiles | Yes | No |
| Contain Pagelets | No | Yes |
| Able to split the ratio as 1-2 or 1-1-1 | No | Yes |
| Able to show free text (html) content | Yes | Yes |
| Able to adjust accordingly to screen size | Yes | Sort of |
| Able to show based on Users permissions | Yes | Yes |
| Can be arranged in priority | Yes | Yes |
| User has ability to create their own | Yes | No |
| Support for tile based integration with other systems | Yes | No |
| Able to show different content for different homepages | Yes | Yes |
Fluid Pages Directory
This folder contains all Tiles found on the local Portal. Once these are created they can be linked to the Fluid Homepages. We will go into detail about the different options later in this section.

Understand How Homepages Combine Tiles Before Designing
In our previous Interaction Hub setup, a lot of the content we linked to resided locally on the Portal. We would create navigation collections in the Portal Registry, and assign roles based on dynamic security, then show them in homepage tabs.
In tools 8.55, if you setup Integration Broker correctly, you will notice that based on Home Page name (for example "Employee Self Service"), content will be pulled in and combined from other systems on the Interaction Hub. There is no need to worry about security, as it is all imported based on the remote security. This is a very neat feature, and when controlled properly can provide a great User Experience with little overhead.
The caveat all boils down to control: when we used to host all content only in Interaction Hub, we could fully control where each tile appeared. This new system allows more cooks in the kitchen, so to speak so it is important to have a central repository, as some Tiles may take screen priority over others. We used a google sheet (click here for a sample) and shared it among all BSAs and security staff. This way when we deliver a tile, we can filter the sheet and have a good idea of which tiles are available and where they should reside. Using this sheet also allows you to consider all fields that should be filled in when creating a tile.
Tiles as Links
The easiest type of tile would be a link to a classic or fluid component. Probably the most noticeable feature of any tile would be the icon you chose to represent the functionality. Fluid Tiles support SVG vector graphics: this means it doesn't matter which form factor you display the image on: an old iPhone or a 4K 32 inch monitor, it will be smooth on both devices. We found icons8.com to have a very good repository of SVG images that match the stock images oracle delivers with their existing tiles. You have to pay a one time fee, but we have found this to be worth the money.
SVG Images can be added a few ways:
EXAMPLE
Example Creating a Tile on Interaction Hub for the Student Center on Campus Solutions. This example will show how to create a tile linking to a classic component in PeopleSoft

1. We selected the Blackboard SVG icon from icons8.com: (the size that works best for us was 80x80 pixels) and uploaded it via: Nav Bar > Navigator > PeopleTools > Portal > Branding > Branding Objects ~ Click the Image tab and and Upload Image Object. The Image was called CUST_BLACKBOARD
2. We then navigated to the portal registry where tabs are stored: Nav Bar > Navigator > PeopleTools > Portal > Structure and Content... Fluid Structure and Content - Fluid Pages
In this directory, we create a new folder
Name: CUST_ACADEMICS
Label: Academics
Sequence: where ever logical based on your organizational needs
Folder Security: Public
3. In the Academics Folder we create a new CREF:
Here are screen caps of each of the 3 tabs of the CREF:
General:
 Note:
Note:
Security:

Fluid Attributes:

4) Assigning this Tile to a homepage.
Return to Nav Bar > Navigator > Peopletools > Portal > Structure and Content - Fluid Structure and Content - Fluid Homepages
At this stage you can use a delivered Homepage, or create your own. We found that Employee Self Service, and Manager Self Service seem to be common delivered Homepages between PeopleSoft Systems. We find that Student Functionality doesn't fit well in the delivered home pages: we created a Custom Home Page:

You would need the same security added to this home page that all tiles within it have. And finally, in the Tile Content tab, add Check the Student Center tile you created and select how you want it to behave on the home screen ~ Req-Fix ~ prevents users from being able to remove the tile.

If you want to force a particular homepage to appear first, you also have the option of setting in in Assign Branding Themes: Nav Bar > Navigator > PeopleTools > Portal > Branding > Assign Themes

Further Consideration ~ there is an easier way to do this!
Because of the way PeopleSoft 8.55 works, the Custom Home Home Page will combine Tiles from other systems. Our Campus Solutions system is on Tools 8.53, and this wasn't possible, but instead of the Dynamic Role solution, you could setup the tile locally on your 8.55 Campus Solutions system, and the Interaction Hub should pull the content and combine it, provided the Homepages have the same name.
Free Text Tiles
We used a lot of free text pagelets to push some more exciting content through our homepages ~ I found the can still be used in tiles and at the time of writing this article, 8.55.05 it is impossible to assign security to the free text tile iscript, so we got Free Text Pagelets working with tiles. Below is an example of creating a youtube video tile:
EXAMPLE
We have to start with creating a free text Pagelet:
Navigate to Nav Bar > Navigator > Peopletools > Portal > Pagelet Wizard > Pagelet Wizard
Add a New Value: CUST_YOUTUBE, give it a title, and select Data Type: Free Text
Use the following code:
<div style="position: relative; padding-bottom: 56.25%; padding-top: 25px; height: 0;" >
<iframe frameborder="0" allowfullscreen style="position: absolute; top: 0; left: 0; width: 100%; height: 100%;" src="https://www.youtube.com/embed/cUYSGojUuAU">no iframe support</iframe>
</div>
Make sure you use "Embed" code from youtube videos here.
Click Save, and Next till the step 6.
You can click HomePage Pagelet, select a folder (Organizers) and set any level of security here.
To make this a tile:
Navigate to the portal registry where tabs are stored: Nav Bar > Navigator > PeopleTools > Portal > Structure and Content... Fluid Structure and Content - Fluid Pages - News
In the News Folder we create a new CREF:
Here are screen caps of each of the 3 tabs of the CREF:
General:
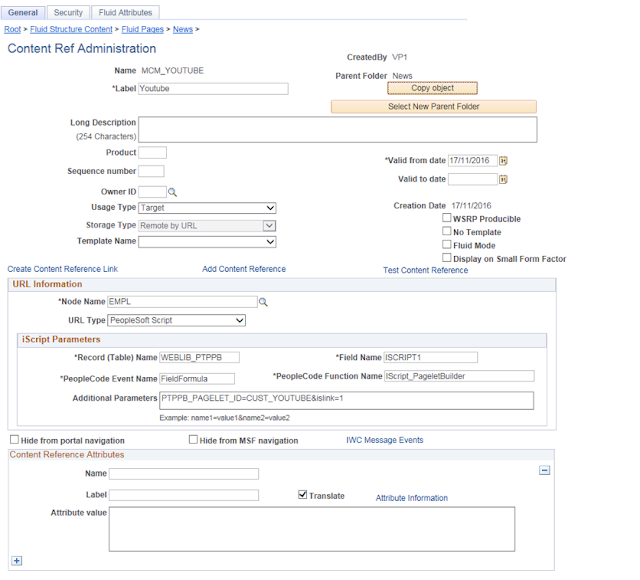
Security:

Fluid Attributes:
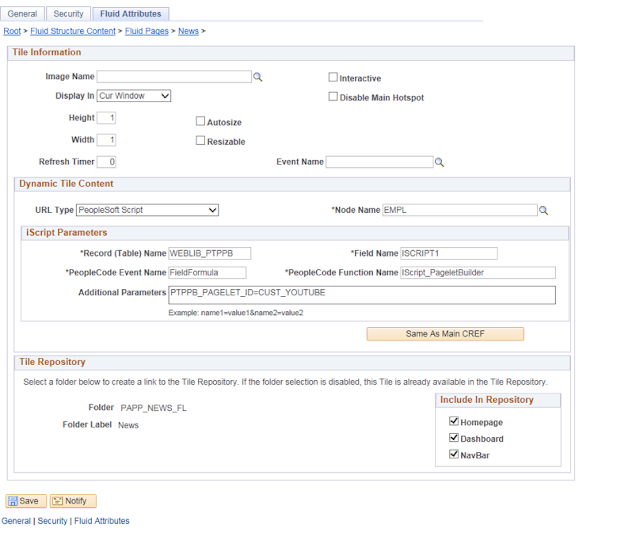
Assigning this Tile to a homepage:
Return to Nav Bar > Navigator > Peopletools > Portal > Structure and Content - Fluid Structure and Content - Fluid Homepages - Employee Self Service, Click the Tile Content Tab, and Add the Youtube video:

The Result:

We are actually pretty excited about tiles: beyond iScripts, you can like to a number of different content types: PeopleSoft Generic URL is an option which opens the door to pretty much any type of content, provided it scales well! Providing analytic information in queries or pivot grids will be a great way to present data and statics aesthetically to your user base.
Other Useful Examples
Based on the two previous examples, other tiles we have had success with:
Edit Favorites ~ this functionality seems to be absent from the nav bar at the time of writing this post, logically we placed it under the Favorites Tile in the Nav Bar:
PeopleSoft Generic URL: c/PORTAL_COMPONENTS.EPPSC_EDIT_MYSC.GBL
Application Start Page ~ similar to a classic workcenter: but optimized for fluid:
PeopleSoft Generic URL: c/NUI_FRAMEWORK.PT_AGSTARTPAGE_NUI.GBL?CONTEXTIDPARAMS=TEMPLATE_ID:PTPPNAVCOL&scname=CUST_NAVCOLL&PanelCollapsible=Y
*where CUST_NAVCOLL can be any nav collection (non-fluid components work best for now).
Tile Migration
It is absolutely possible to add tiles content to a project to Migrate: ensure you have your images and the Portal Registry Structures to a project:
Via App Designer:
Insert > Definitions into Project > Portal Registry Structures
Portal Name: Employe
Object Names:
PORTAL_LP_TAB
PORTAL_GROUPLETS
When migrating portal registry structures you always need to have import the root object. From here you can also ensure all the related definitions are selected (and any folders in between):

You can then save the rest of your Custom Folders and Crefs... I would strive to use a common naming convention here something like CUST_TILE, so that it will be easy to add these into a Project.
Migration between tools environments, using App Designer: Tools > Copy project to File in the source environment, and Tools > Copy Project from File in the destination environment will get these moved across. Phire is a great tool to do this in a controlled manner: just ensure you are using the latest version to get the fluid stuff moved across.
Beyond Caching: Tiles and Homepages
I like to say the Homepage preferences on Tools 8.55 in some cases, work like a baby duck. That is, the first thing a baby duck sees it will imprint and believe it is their mother (even incorrectly). In 8.55 when you first login, a few things will get saved, making it difficult to change later.
8.55 holds a lot of information about tiles in the following tables:
select * from PSPRUHDEFN;
select * from PSPRUHTAB;
select * from PSPRUHTABPGLT;
From our observations, these initially get created from the portal registry upon the first login, but some things tend to linger around. For example, we have found it difficult to re-name Homepages once somebody has already logged in. Also removing tiles from the home page in the portal registry may force them to linger around as optional tiles. One way to clear these out would be to delete / recreate the account. It has also been suggested that deleting information from these does the trick: I await for a function like "Clear Users's Preferences" that would do this cleanly. Until then, be careful about Homepage names: they can be tricky to change. Hiding and showing unwanted tiles can ultimately be controlled by security.
In our previous Interaction Hub setup, a lot of the content we linked to resided locally on the Portal. We would create navigation collections in the Portal Registry, and assign roles based on dynamic security, then show them in homepage tabs.
In tools 8.55, if you setup Integration Broker correctly, you will notice that based on Home Page name (for example "Employee Self Service"), content will be pulled in and combined from other systems on the Interaction Hub. There is no need to worry about security, as it is all imported based on the remote security. This is a very neat feature, and when controlled properly can provide a great User Experience with little overhead.
 |
| Company News comes from Interaction Hub and the rest of the tiles come from HR. The system did this automatically. |
The caveat all boils down to control: when we used to host all content only in Interaction Hub, we could fully control where each tile appeared. This new system allows more cooks in the kitchen, so to speak so it is important to have a central repository, as some Tiles may take screen priority over others. We used a google sheet (click here for a sample) and shared it among all BSAs and security staff. This way when we deliver a tile, we can filter the sheet and have a good idea of which tiles are available and where they should reside. Using this sheet also allows you to consider all fields that should be filled in when creating a tile.
Tiles as Links
The easiest type of tile would be a link to a classic or fluid component. Probably the most noticeable feature of any tile would be the icon you chose to represent the functionality. Fluid Tiles support SVG vector graphics: this means it doesn't matter which form factor you display the image on: an old iPhone or a 4K 32 inch monitor, it will be smooth on both devices. We found icons8.com to have a very good repository of SVG images that match the stock images oracle delivers with their existing tiles. You have to pay a one time fee, but we have found this to be worth the money.
SVG Images can be added a few ways:
- Via the PIA: Nav Bar > Navigator > PeopleTools > Portal > Branding > Branding Objects ~ Click the Image tab and and Upload Image Object (need the Portal Administrator Role for this)
- Via App Designer: New > Image, Select the SVG Image and save.
SVG Images can also be added to a project in App Designer, and Migrated between tools environments, using Tools > Copy project to File in the source environment, and Tools > Copy Project from File in the destination environment.
EXAMPLE
Example Creating a Tile on Interaction Hub for the Student Center on Campus Solutions. This example will show how to create a tile linking to a classic component in PeopleSoft

1. We selected the Blackboard SVG icon from icons8.com: (the size that works best for us was 80x80 pixels) and uploaded it via: Nav Bar > Navigator > PeopleTools > Portal > Branding > Branding Objects ~ Click the Image tab and and Upload Image Object. The Image was called CUST_BLACKBOARD
2. We then navigated to the portal registry where tabs are stored: Nav Bar > Navigator > PeopleTools > Portal > Structure and Content... Fluid Structure and Content - Fluid Pages
In this directory, we create a new folder
Name: CUST_ACADEMICS
Label: Academics
Sequence: where ever logical based on your organizational needs
Folder Security: Public
3. In the Academics Folder we create a new CREF:
Here are screen caps of each of the 3 tabs of the CREF:
General:

- We used PeopleSoft generic URLs here ~ this was done so that we include this tile to display on Small Form Factor ~ if you choose PeopleSoft Component, you don't seem to have control of this. We found we had to convert a lot of our components to generic URLs else the tiles wouldn't appear on mobile devices ~ which really defeats the purpose of fluid adoption.
Security:

- The CUST_ROLES we have here are being dynamically generated in the Campus Solutions source system then copied across using an asynchronous service operation. More details on how to do that can be found in this article.
Fluid Attributes:

- These attributes are relatively straightforward. There are a number of things you can do with Dynamic Tile Content that I will discuss later in this article.
4) Assigning this Tile to a homepage.
Return to Nav Bar > Navigator > Peopletools > Portal > Structure and Content - Fluid Structure and Content - Fluid Homepages
At this stage you can use a delivered Homepage, or create your own. We found that Employee Self Service, and Manager Self Service seem to be common delivered Homepages between PeopleSoft Systems. We find that Student Functionality doesn't fit well in the delivered home pages: we created a Custom Home Page:

- The lower the sequence number, the higher priority your homepage will have: if it is first, it will appear first when logging in. Again it makes sense to keep all of these homepages and sequence numbers tracked in a single spot among all your streams: so you can determine which users will see what homepages.
You would need the same security added to this home page that all tiles within it have. And finally, in the Tile Content tab, add Check the Student Center tile you created and select how you want it to behave on the home screen ~ Req-Fix ~ prevents users from being able to remove the tile.
If you want to force a particular homepage to appear first, you also have the option of setting in in Assign Branding Themes: Nav Bar > Navigator > PeopleTools > Portal > Branding > Assign Themes

Further Consideration ~ there is an easier way to do this!
Because of the way PeopleSoft 8.55 works, the Custom Home Home Page will combine Tiles from other systems. Our Campus Solutions system is on Tools 8.53, and this wasn't possible, but instead of the Dynamic Role solution, you could setup the tile locally on your 8.55 Campus Solutions system, and the Interaction Hub should pull the content and combine it, provided the Homepages have the same name.
Free Text Tiles
We used a lot of free text pagelets to push some more exciting content through our homepages ~ I found the can still be used in tiles and at the time of writing this article, 8.55.05 it is impossible to assign security to the free text tile iscript, so we got Free Text Pagelets working with tiles. Below is an example of creating a youtube video tile:
EXAMPLE
We have to start with creating a free text Pagelet:
Navigate to Nav Bar > Navigator > Peopletools > Portal > Pagelet Wizard > Pagelet Wizard
Add a New Value: CUST_YOUTUBE, give it a title, and select Data Type: Free Text
Use the following code:
<div style="position: relative; padding-bottom: 56.25%; padding-top: 25px; height: 0;" >
<iframe frameborder="0" allowfullscreen style="position: absolute; top: 0; left: 0; width: 100%; height: 100%;" src="https://www.youtube.com/embed/cUYSGojUuAU">no iframe support</iframe>
</div>
Make sure you use "Embed" code from youtube videos here.
Click Save, and Next till the step 6.
You can click HomePage Pagelet, select a folder (Organizers) and set any level of security here.
To make this a tile:
Navigate to the portal registry where tabs are stored: Nav Bar > Navigator > PeopleTools > Portal > Structure and Content... Fluid Structure and Content - Fluid Pages - News
In the News Folder we create a new CREF:
Here are screen caps of each of the 3 tabs of the CREF:
General:

Security:

Fluid Attributes:

- Ensure this iScript_PageletBuilder is added to your Permission Lists that would access this.
Assigning this Tile to a homepage:
Return to Nav Bar > Navigator > Peopletools > Portal > Structure and Content - Fluid Structure and Content - Fluid Homepages - Employee Self Service, Click the Tile Content Tab, and Add the Youtube video:
The Result:

Other Useful Examples
Based on the two previous examples, other tiles we have had success with:
Edit Favorites ~ this functionality seems to be absent from the nav bar at the time of writing this post, logically we placed it under the Favorites Tile in the Nav Bar:
PeopleSoft Generic URL: c/PORTAL_COMPONENTS.EPPSC_EDIT_MYSC.GBL
Application Start Page ~ similar to a classic workcenter: but optimized for fluid:
PeopleSoft Generic URL: c/NUI_FRAMEWORK.PT_AGSTARTPAGE_NUI.GBL?CONTEXTIDPARAMS=TEMPLATE_ID:PTPPNAVCOL&scname=CUST_NAVCOLL&PanelCollapsible=Y
*where CUST_NAVCOLL can be any nav collection (non-fluid components work best for now).
Tile Migration
It is absolutely possible to add tiles content to a project to Migrate: ensure you have your images and the Portal Registry Structures to a project:
Via App Designer:
Insert > Definitions into Project > Portal Registry Structures
Portal Name: Employe
Object Names:
PORTAL_LP_TAB
PORTAL_GROUPLETS
When migrating portal registry structures you always need to have import the root object. From here you can also ensure all the related definitions are selected (and any folders in between):

You can then save the rest of your Custom Folders and Crefs... I would strive to use a common naming convention here something like CUST_TILE, so that it will be easy to add these into a Project.
Migration between tools environments, using App Designer: Tools > Copy project to File in the source environment, and Tools > Copy Project from File in the destination environment will get these moved across. Phire is a great tool to do this in a controlled manner: just ensure you are using the latest version to get the fluid stuff moved across.
Beyond Caching: Tiles and Homepages
I like to say the Homepage preferences on Tools 8.55 in some cases, work like a baby duck. That is, the first thing a baby duck sees it will imprint and believe it is their mother (even incorrectly). In 8.55 when you first login, a few things will get saved, making it difficult to change later.
8.55 holds a lot of information about tiles in the following tables:
select * from PSPRUHDEFN;
select * from PSPRUHTAB;
select * from PSPRUHTABPGLT;
From our observations, these initially get created from the portal registry upon the first login, but some things tend to linger around. For example, we have found it difficult to re-name Homepages once somebody has already logged in. Also removing tiles from the home page in the portal registry may force them to linger around as optional tiles. One way to clear these out would be to delete / recreate the account. It has also been suggested that deleting information from these does the trick: I await for a function like "Clear Users's Preferences" that would do this cleanly. Until then, be careful about Homepage names: they can be tricky to change. Hiding and showing unwanted tiles can ultimately be controlled by security.
Section Three - Branding and Migration
Branding in Interaction Hub, Image 2 on Tools 8.55 also has some nice new features particularly with themes:
Theme Builder - Nav Bar > Navigator > Portal Administration > Theme Builder > Theme Builder
Theme Builder Advanced Setting - Nav Bar > Navigator > Portal Administration > Theme Builder > Theme Builder Advanced Setting
The new Theme Builder which looks exclusive to Interaction Hub in 8.55 employs a fluid activity guide to quickly create a branded theme. You can assign security, publish and even create a migration project from this Activity guide: it provides some very nice functionality here.
We learned that some of the fine tuning needs a second component: Theme Builder Advanced Setting ~ this will allow you to adjust branding on additional Portal navigation features, such as the background colour of the Nav Bar.
EXAMPLE
Example: Custom Fluid branding in PeopleSoft Interaction Hub 8.55:
You can upload an SVG directly in theme builder, but it is also possible to upload a file in the branding objects. Make sure the SVG you use has a readable height at around 28 pixels, as this will scale properly with your header.
Nav Bar > Navigator > PeopleTools > Portal > Branding > Branding Objects ~ Click the Image tab and and Upload Image Object
and upload it as CUST_LOGO
now, lets create and deploy a new theme:
Navigate To Theme Builder - Nav Bar > Navigator > Portal Administration > Theme Builder > Theme Builder

Click Clone on the PAPPBR_THEME_FLUID row
Set the name / description as CUST_THEME / Custom Theme and Save
Click Edit beside CUST_THEME


Click Publish and that should deploy your new theme.
... right under the publish button, you will see a 'Create Data Migration Project'... this will be useful if you wish to export this theme. You could do it at this stage, but I recommend you first browse to Theme Builder Advanced Setting as it gives you more granular control over things like the Nav Bar background color.
This is the final result:

Data Migration Workbench
You can upload an SVG directly in theme builder, but it is also possible to upload a file in the branding objects. Make sure the SVG you use has a readable height at around 28 pixels, as this will scale properly with your header.
Nav Bar > Navigator > PeopleTools > Portal > Branding > Branding Objects ~ Click the Image tab and and Upload Image Object
and upload it as CUST_LOGO
now, lets create and deploy a new theme:
Navigate To Theme Builder - Nav Bar > Navigator > Portal Administration > Theme Builder > Theme Builder

Click Clone on the PAPPBR_THEME_FLUID row
Set the name / description as CUST_THEME / Custom Theme and Save
Click Edit beside CUST_THEME

- You can also upload an image from here
- Click Save and Next

- We set the default theme to Yes and Added a Role under Assign Theme to Attributes.
- Save and click next.
Click Publish and that should deploy your new theme.
... right under the publish button, you will see a 'Create Data Migration Project'... this will be useful if you wish to export this theme. You could do it at this stage, but I recommend you first browse to Theme Builder Advanced Setting as it gives you more granular control over things like the Nav Bar background color.
This is the final result:

Data Migration Workbench
It is no coincidence that Oracle has included a link to export your theme using Data Migration Workbench. You will find as you navigate between Interaction Hub and remote fluid components, such as Pay on PeopleSoft Human Resources, that component will no longer have any of the Branding you have set. This feels like a step backwards, as a key benefit to Interaction Hub in the classic world is that you only need to do branding in one place: Interaction Hub.
Thankfully you can copy themes created from Interaction Hub via Data Migration workbench to other environments relatively easily. The bonus here is we have found the theme gets automatically applied when you visit a remote fluid component via Interaction Hub: with no further configuration needed on the remote system: here is the use case:
-IH Admin creates CUST_THEME
-IH Admin exports CUST_THEME and imports it using Data Migration Workbench to HCM system
-When user logs directly into HCM system, theme setting remains as the default (dark blue)
-When user logs into IH, and via IH visits the Pay Fluid Component, the theme settings CUST_THEME exported into HCM will apply to the user's session as long as they are logged in.
EXAMPLE
Each environment is different, but I have written up a set of steps to migrate a theme from IH to HR using PUM images.
Export Theme
- Navigate to your IH PUM VM Virtual Box Console
- Login as root
- Browse to: cd /opt/oracle/psft/ptdb/custhome/ (I had to create the last 2, using mkdir)
- Run: mkdir ads_out
- Run: chown -R pasdm2:oracle ads_out/
- Sign into the PIA as a PeopleSoft Administrator
- Navigate to: Nav bar -> PeopleTools -> Lifecycle Tools -> Migrate Data -> Manage File Locations
- Add a new value:
- Location Name: CUST_FILE_LOCATIONS
- Path: /opt/oracle/psft/ptdb/custhome
- Save, the Area Name should be ads_out
- Navigate to Theme Builder: Nav bar-> Portal Administration -> Theme Builder
- Click edit on a custom theme
- Click the Review and Publish link in the activity guide
- Click: Create Data Migration Project
- Project Name: CUST_CUSTOM_THEME
- Description: Custom Branding Theme
- Save (and goto Project same as first two steps below)
- Navigate to: Nav bar -> PeopleTools -> Lifecycle Tools -> Migrate Data -> Data Migration Workbench
- Search CUST_CUSTOM_THEME
- Click Copy To File
- Click Run
- Load up Win SCP as Root
- Navigate to: /opt/oracle/psft/ptdb/custhome/ads_out
- Verify directory is there: CUST_CUSTOM_THEME
- Copy these files to a shared location that your HR PUM Image can access.
Import Theme:
- Perform Steps above on the ads_out directory and setup manage file locations on the target system.
- Copy the folder: CUST_CUSTOM_THEME to : /opt/oracle/psft/ptdb/custhome/ads_out
- Navigate to: Nav bar -> PeopleTools -> Lifecycle Tools -> Migrate Data -> Data Migration Workbench
- Click: Load Project from File
- Select the CUST_CUSTOM_THEME
- Click Submit for Copy
- Click Run to run the process
Again, the theme should be applied in your Target Remote system, but only should appear when you come through the Interaction Hub.
Section Four - 8.55 Security Changes
There are a lot of security Objects that get delivered with tools 8.55 ~ Oracle recommends that you clone all permission lists in these roles:
PAPP_USER
EOPP_USER
PeoopleSoft User
and apply to a General User role. From there you would work towards removing functionality not needed. We found when you need to remove functionality, very good place to start would be seeing the difference between the Guest Roles:
PAPP_GUEST
EOPP_GUEST
PeopleSoft Guest
Things like the Search Bar, removing items from the Action List, The Notification Flag all are controlled by security, and the guest roles don't have them.
Function:
Disable Personalize Homepage Link from Action List
Menu:
PORTAL_PERS_HOMEPAGE
Component:
PORTAL_HOMEPAGE
Page:
ALL
Function:
Hide Alerts Flag in Header
Menu:
PTPNEVENTS
Component:
PTPN_POPUP_WINDOW
Page:
Notification Window
Function:
Hide Search in Header
Menu:
PORTAL_ADMIN
Component:
PTSF_GBLSRCH_FLUID
Page:
Search Results
Function:
Disable Add To Links from Action List
Web Library:
WEBLIB_PTNUI
Function:
PT_BUTTON_PIN.FieldFormula.IScript_SavePin
Function:
Hide Sign Out Link
Web Library:
WEBLIB_PORTAL
Ensure the following is set to No Access
PT_PORTAL_HDR_LINK.FieldFormula.IScript_HideSignOutLink
Section Five - Further Recommendations and Backwards Compatibility
In my previous post, I took the opportunity to get two Pum Images: Interaction Hub Image 2 and Human Capital Management Image 18 working with Unified Navigation on a laptop. Not everyone will be so fortunate to work in such a stock environment. As we upgraded our PeopleSoft Interaction Hub to Tool 8.55 we found out a few things.
Fluid Unified Navigation is only supported between 8.55 and 8.54 environments, and really you should only link 8.55 environments up.

In tools 8.55 the intention is to move away from the old way of navigating, and to create your own home pages. By default, the old Main Menu has been hidden, and the recommended only way to navigate is through the Nav Bar. This came as a surprise to us as Unified Navigation with our 8.53 systems didn't work. In order for Unified Nav to work in the new fluid mode, you must be on tools 8.54 or greater. We encountered a few issues with 8.54, so it would be ideal to have all streams in your environment at PeopleTools 8.55 for a unified experience.
Idealism is sometimes far from reality, as it is difficult to upgrade all systems at once. As part of our upgrade plan, have chosen to update our Interaction Hub and HR system to 8.55 first, followed by our Finance System, EPM then finally Campus Solutions. We have established some workarounds and tricks to allow us to take advantage of the new Fluid Features while bridging to the older systems as we upgrade throughout the year. Check the Tiles and Homepages Section below for an example on how to create a classic tile in a fluid environment: also check the Security section on how to granularly disable some of the fluid functionality (like add to homepage).
8.55 Isn't for Everyone
 You will need to be careful to ensure all your users are using certified web browsers. For example this link here relays the fact that as of this blog posting, Chrome is only officially supported with Windows.
You will find that fluid pages aren't supported by older versions of IE, or users who use different flavours of the Linux OS: and these systems will be directed to the Classic Homepage Tabs. Ensure your classic pages still work if there is no way to get around this.
Fluid Unified Navigation is only supported between 8.55 and 8.54 environments, and really you should only link 8.55 environments up.


Performance and Caching

Pay attention to your caching settings in your web profile: (Nav Bar > Navigator > PeopleTools > Web Profile > Web Profile Configuration). The stock configuration as seen in Interaction Hub Image 2 seems to perform well for us in a highly integrated environment. This was not the case for our Classic Homepage Pagelets ~ so we had to revert to the stock settings. Fixes in 8.55 allow the system to only render tiles that are requested on the homepage ~ this has large performance improvements over 8.54 where all the tiles were loaded at login.
With these settings enabled. some troubleshooting tips for users having issues (for example the Nav bar not refreshing) would be to hit Ctrl-Shit-Delete on their browser (firefox and chrome) and clear their cookies, and other cache settings.

Section Six - Comprehensive Testing

With a tools 8.55 fluid roll out, we find that the system now has two personalities: Classic and Fluid. When designing and testing content in PeopleSoft Interaction hub, it isn't enough just to test one case before you can safely say something is working: a lot of new criteria need to be looked at.
The list below runs through some of the test cases to help troubleshoot specific issues or functionality.
Troubleshooting / Problem Solving Steps for Portal Registry Structures.
- When the user logs into the system for the very first time, do they see different results from a user who has been using the system for a while? (this tests personalization settings).
- Does a Content Reference for what you are trying to access exists on the Interaction Hub, or on the remote system? (CREF found via Nav bar > Navigator > PeopleTools > Portal > Structure and Content)
- Does the issue only happen for fluid CREFS or classic CREFS?
- Can you add your content as a favorite?
- Can you add your content as a tile to a home page?
- Can you can you add your content to the nav bar?
- If you skip the Interaction Hub and go directly to the remote system (for example People Soft Human Resources) does the same issue happen, or is the issue Integration based?
- Does the Issue Happen when you use delivered security roles (PeopleSoft User, EOPP_USER, PAPP_USER) or super user accounts like VP1 on all systems?
- Does the issue happen between different versions of Peopletools? (we have seen much better results when all PeoleSoft systems are at the same tools version).
- Are your IB Settings Configured Correctly? Do your nodes have the correct number of routings?
- Can you reproduce the problem in vanilla environments like the PUM images?
I usually run through all of these scenarios before creating an SR with oracle support: if they don't solve the issue, at least they would provide some valuable insight.
Section Seven - Other Resources
This article, while still relevant finds itself a few years old. In terms of additional training, the best fluid course I have taken thus far is Fluid 1 & Fluid 2 with Jim Marion (my inspiration for writing this blog) at JSMPROS. The course was a informative and funny: you can find out what it takes to become a "Group Box Hero". I highly recommend!!


